
| Note: Assignment I Part II (RPC) has been updated with some additional hints Important: Some of you may not have get our explanatory email . Get the mentioned Java-File here. |
Introduction
In the first Assignment, you will write a client and a server. Both of them will communicate
with a server and a client on our side (in fact with program acting both as a server and a
client)
Let's have a look at what we want to achieve. Note that this is an overview. For more
detailed descriptions, see the following sections
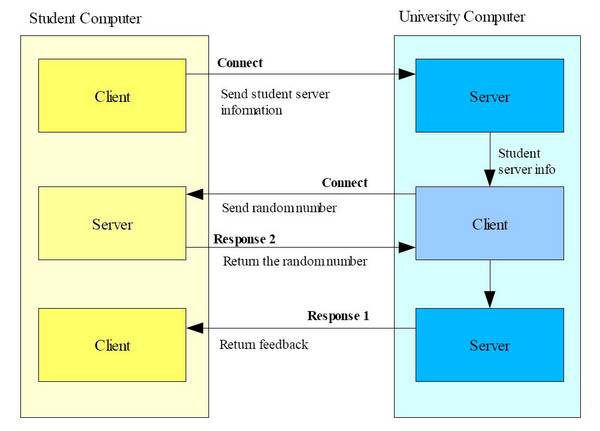
- Your client connects to our server
- Our server asks for the IP and Port to connect to your server
- Our client connects to your server
- Our client sends a random number to your server
- Your server returns the number
- Our server will send a feedback to your client (so you know if everything worked fine)
In this assignment, you get to know two different approaches to implement this fairly
simple functionality.
In Part I we'll use plain sockets, while in Part II we'll make use of RMI (remote method invocation).
Due date: Tuesday 05.12.2006
Part 1: Using Sockets
Learning about sockets
Read the following resource carefully to learn about sockets:
http://java.sun.com/docs/books/tutorial/networking/sockets/index.html
This tutorial is very comprehensive; after reading (and understandig) it, implementing the
functionality mentioned above should be qute straightforward.
If you never did any network programming in Java, it may be a good idea to read some more:
http://java.sun.com/docs/books/tutorial/networking/index.html
You may want to have a look at other information:
http://de.wikipedia.org/wiki/Socket
http://www.javaworld.com/javaworld/jw-12-1996/jw-12-sockets.html
http://jan.netcomp.monash.edu.au/distjava/socket/lecture.html
Implementation
You have to implement 4 java classes:
- SocketClient.java: This class connects to the server and communicates with it according to the ClientProtocol
- ClientProtocol.java: This class describes how your client reacts to our servers messages (see the Knock-Knock-Protocol in the Java Tutorial)
- SocketServer.java: This class sets up a socket listening for our client to connect - and communicates with our client
- ServerProtocol.java: This class describes guess what how your server reacts to the messages of our client
Client Additional Information:
You can reach our server at this IP and Port: 130.60.155.148:9090
If you are connected, it will ask for your name (The exact message is: Please send us your name. - in case you want to use the string in you ClientProtocol class) Return a string with your name.
After that, it will ask for your student number (Please send us your student number.)
Return a string with your student name please use correct information only, we will log this.
Next, our server will ask for the IP of your server (Please send us your server name.) and the port number (Please send us your server port number.)
Having all the information it needs, our server (which is, at the same time, a client) tries to connect to your server at the given IP and Port.
Server Additional Information
Your server just waits for our client to connect and when receiving our challenge (the random number), returns it unaltered. Easy.
Finding out about your IP
To be able to send us the IP of your server, you should first know it. There are serveral way to find out.
For example, you can display it with the DOS-Command ipconfig in Windows-Systems.
Since you may have a dynamic IP Address, it's a better idea to use the method
getLocalHost() in the class java.net.InetAddress. It will return your current IP-Address dynamically in your program code.
Troubleshooting
If you are behind a firewall, you may not be able to use the ports you want. Open the ports in your firewall or shut it down for a few minutes - but don't forget to start it again afterwards...
Part 2: RPC
Let's do it again, but this time use Remote Procedure Calls!
Learning about RPC / RMI
RMI is a Java implementation for RPC.
Read java.sun.com/docs/books/tutorial/rmi/index.html
We recommend to use eclipse with the RMI plugin from genady:
http://www.genady.net/rmi/
The plugin is commercial, but free for a test period of 14 days.
It will help you to avoid some sources of error and contains a handy registry inspector and more.
Have a look at the plugin tutorials and read
http://www.tutorials.de/forum/java/187420-eclipse-und-rmi.html
to get started.
Of course, you can do it all by hand, without using the plugin.
Additional Information:
Since some of you reported problems with the RMI-Part of the assignment, we try to help you with some additional information:
- Do use the plugin - it seems to be very hard to get the code working manually.
- Do read and try to understand the Sun's RMI Tutorial that comes with the plugin. After installing the plugin, create a new project. Under Java/RMI, choose the RMI project tutorial wizard. Click next and choose the "Sun's RMI Tutorial to have a working example you can build your solution on. Note: The tutorial version on Sun's Website (Link above) was updated recently and doesn't seem to work with the plugin, so use the one that comes with the plugin.
- Read the tutorial http://www.tutorials.de/forum/java/187420-eclipse-und-rmi.html as well. It is short and it helps.
- Read our new hints:
- Get your server class working first.
Your server is implemented in one quite simple class (StudentEngine.java as mentioned below) - it should look very similar to the ComputeEngine class in the tutorial....The class has to implement the executeUniserverTask method (see interface "Student" definition..) This method should execute the UniserverTask t. The return value is an object (our random number..) you should cast to an Integer:
Integer theNumber = (Integer)t.execute();
Now all you have to do is to return this Integer and your executeUniserverTask method is done.... (Remember in the socket part you did the same with the random number)
Use the registry inspector to make sure your StudentEngine is bound to your local registry. - Now you can do the client part:
Implement it in two classes:
The StudentRegistry class is very similar to the ComputePi class in the tutorial mentioned above.
The Registration class is even simpler: according to the StudentTask it implements (see below), three methods: fetchStudentHostname() returns the URL of your remote object, casted as an object:
public Object fetchStudentHostname(){
String name = "something like //130.60.156.61/Student"
return (Object)name;
}
- Get your server class working first.
..what the other methods do should be self-explaining....
Important:
You can hand in the RMI-part (not the socket-part) in groups of max. three persons if you want, since it seemed to cause more trouble than expected.
Implementation
First of all, you'll need some interface definitions we built. Download them here.
Implement three classes:
- StudentRegistry.java - this class tries to call the Uniserver.executeStudentTask method to start the functionality described in the figure above. You can find our remote object at "//130.60.155.148/Uniserver".
- Registration.java - this class implements the StudentTask interface. The method fetchStudentHostname() should return the information we need to access your remote object (something like "//130.60.150.00/Student")
- StudentEngine.java - this class extends UnicastRemoteObject and implements the Student interface. The method executeUniserverTask returns the received number.
Make sure you start your RMI registry server at port 1099 (the default port).
The rest remains the same - have fun!
What to hand in
You have to
make sure that your client and server communicated at least one time successfully communicated with our server/client (according to the protocol described above) - for both part I and part II. Our log files will tell us. Don't worry about unsuccessful attempts, they are ok. Please make sure you are using your correct student id and name.
hand in your java source code via email (luell(at)ifi.unizh.ch). Please make sure your code contains meaningful comments you don't have to write full javadoc, just give some short hints what the code is doing.